

Welcome to our complete guide to learning guitar. In this article, we’re going to go over the most important aspects to get you started with guitar.
Some of you may be asking how long it takes to learn guitar. The honest truth is that it depends. If you commit and practice regularly, you can be playing some songs in a matter of days. This is true even if you decide to learn to play guitar without a teacher and get your info online.
If you are serious about learning guitar, check out Roadie Coach. This fantastic tool easily attaches to your guitar, features two microphones, and works together with its accompanying app. With Coach, you get personalized feedback that helps you advance, a plethora of resources and a vast song library. Without further ado, let’s delve into the complete guide to learning guitar.
Guitar Types Overview
We can divide guitars into two major groups: acoustic and electric. Acoustic guitars also have differences. The main one is based on their strings. Some acoustics feature nylon strings and are also referred to as classical guitars, even though they are also used in Flamenco, Bossa Nova, Jazz, etc. Other acoustics use steel strings and are popular for Folk, acoustic rock, and other styles.
Here are a few examples of the most common Acoustic guitar shapes:
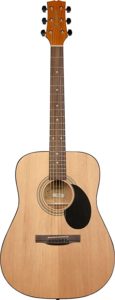
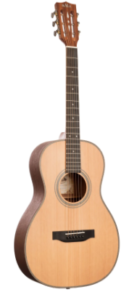
Auditorium Classical Concert
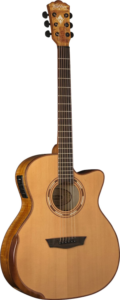
Slope-Shoulder Dreadnought Parlour
– Further Reading – A Quick Guide to Acoustic Guitar Shapes
Electric guitars
Electric guitars come with different construction techniques and variables in their design. For instance, solid bodies are commonly used for rock, while hollow bodies are used for jazz.
There are also semi-hollow bodies, for folks that want a mix between both worlds. Furthermore, there are different solid body models and so forth. In other words, there is something for every possible taste and preference when it comes to guitars.
– Further Reading – Guide to Understanding The Types of Electric Guitars
Guitar Buying Guide
If you are just starting out, our recommendation is that you buy a guitar for beginners. These are quite affordable and a great first step into the fascinating world of learning guitar. We recommend that you stick to well-known brands that offer affordable models. Names like Fender, Epiphone, Squire, and Yamaha offer great choices for inexpensive guitars for beginners.
The Best Guitars for Beginners
Squire Classic Vibe Stratocaster
The Stratocaster is the most popular electric guitar model in history. Fender created this guitar over half a century ago, and its shape, sound, and sheer functionality have endured decades. To this day, it is hard to go wrong with a Strat—or any Fender guitar for that matter.
Yamaha Pacifica
This guitar is another Stratocaster-like model by one of the biggest and most respectable companies in the business. Yamaha has been making instruments and audio products that run the gamut from high-end to affordable, and as a matter of fact, the Yamaha Pacifica is basically a Stratocaster, but with a lower price tag.
Ibanez PF2MH 3/4
If you’re looking for a good acoustic guitar to start out with, the Ibanez PF2MH 3/4 might be just what you need. This mini-body style makes it easier on your hands and fingers if you’re just starting out. With its six steel strings and great choice of wood, this acoustic guitar has a price that is quite appealing. You can get started with a good instrument for a very affordable price. What’s there not to like?
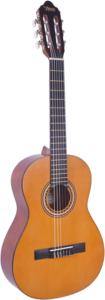
Epiphone Pro-1
Epiphone is another well-known guitar manufacturer and has been in business since 1873. This nylon string acoustic guitar features a smaller, more comfortable body than traditional steel string guitars and makes learning to play more comfortable for beginners.
Beginners often start out on nylon-string acoustic guitars because of their relative ease and their lower price. The Epiphone Pro-1 certainly has both traits covered and is a great instrument to begin playing.
– Further Reading – Best Guitars for Beginners
Naturally, as you get better with time and practice, you can upgrade your instrument to a pricier guitar.
So, When Should You Upgrade Your Guitar?
Your current guitar is not functioning well
To check whether your guitar needs to be upgraded, try playing it. Is the sound you’re hearing good or bad? Perhaps there’s something wrong with the electronics or pickups? Maybe you need to have someone look at it and replace these components? Will the price for this be as high as buying a new guitar?
You need or want a better guitar
It is important to have the best equipment possible, especially if you are going to be working in the studio. If you are getting a lot of recording work and your guitar isn’t up to snuff, go ahead and upgrade it. Guitarists want their instruments to sound great so they can focus on what they are doing and not have distractions.
You need to expand your tonal palette
Guitarists often have multiple guitars for different situations. Acoustic, nylon-string, baritone and so on. This is especially true for studio and touring musicians. For example, maybe you have a strat-type guitar but need a hollow-body to get more of a jazz-sounding sound. This will definitely upgrade your collection and be a welcome addition.
The rest of your gear has been upgraded already
You’ve painstakingly built your pedal board and carefully researched the ideal signal chain. You’ve invested in a boutique amplifier that sounds like a dream. But you’re still playing on that cheap guitar you got as a gift? It’s time to upgrade your guitar, my friend. It’s no use having high-end gear that is connected to low-quality gear. And that goes both ways. In other words, having a four thousand-dollar guitar play through a 200-dollar amp makes no sense.
– Further Reading – When Should You Upgrade Your Guitar
Plectrums
Many folks choose to play guitar with a pick, also known as plectrums. Here you will have another important choice to make, as picks come in a variety of sizes, types, and materials.
Pick Gauge
You’ve probably noticed that plectrums have millimeter-scale gauges printed on them. The type of music you’ll get from those gauges is greatly influenced by them. The three primary categories are:
-
Light Gauge Plectrums (.40mm to .60mm)
Light Gauge Plectrums are perfect if you’re an acoustic singer-songwriter type. They have little resistance when strumming which makes it a lot easier for beginners.
-
Medium Gauge Plectrums (.60mm to .80mm)
For rock rhythm work and full-bodied acoustic accompaniment (particularly in solo circumstances), Medium Gauge picks provide an ideal balance of rigidity and flexibility. They also have enough weight to generate powerful tones on leads and hook figures.
-
Heavy Gauge Plectrums (.80mm to 3mm)
a heavier plectrum is key to a heavier sound. Crunchy rhythms, dynamic solos, and meaty-sounding lead lines are much easier to obtain when you’ve got a .80mm to 1.5mm pick in your hand.
Pick Material
-
Tortoiseshell
As the name suggests, these picks are (or were!) made from the shell of the Atlantic Hawksbill Turtle, a reptile that has long been on the endangered species list. As a result “tortoiseshell” has been banned from sale since 1973.
-
Tortex
Following the banning of Tortoiseshell, pick manufacturers sought to emulate the material’s style without getting themselves in legal hot water. They developed the Tortex picks.
Powdery in texture, Tortex picks apply friction to the strings and grip really well. They give good tone, have a nice attack an agreeable feel. No wonder they became the pick of choice for everyone from James Hetfield and Dimebag Darrel to Kurt Cobain and Chris Cornell; upon their popularization in the late ‘80’s-early ‘90’s.
-
Ultem
A relatively new innovation, Picks made from Ultem (otherwise known as polyetherimide) boast an impressive combination of flexibility and huge attack. By many accounts they’re virtually indestructible and provide a huge dynamic range compared to other picks on the market; – great for adding light and shade into your playing.
-
Nylon
Nylon picks have textured grips, which act against sweaty fingers and keep that Guitar Plectrums in your hand. They’re famous for producing very bright sounds; as well as their incredible flexibility, which is great if you want some spring in your guitar playing.
– Further Reading – Guitar Plectrums Part 2: Material
Shapes and Bevels
You’ve probably heard the terms “tip” and “bevel” used in relation to plectrums before, but perhaps haven’t understood what they mean.
Put simply, the tip is the pointy bit on the end of your plectrum, while the bevel refers to the sloping edges around that tip.
Sharper picks tend to be better for fast lead lines – especially when it comes to things like tremolo picking, as well as chuggy rhythm parts. Rounded edges, meanwhile, are going to produce mellower sounds, and are generally preferred by acoustic strummers.
Likewise, the bevel affects the plectrum’s attack on the guitar string. The more contoured that edge, the lesser the degree to which the pick grips the string. A good bevel is preferred by most players, simply because it means that the pick glides off the string, making playing easier.
– Further Reading – Guitar Plectrums Part 3: Shapes and Bevels
Playing Styles
Some musicians may opt to play fingerstyle instead of employing a pick. Fingerstyle is the way to go in classical music and flamenco. It is also very popular with folk music.
In reality, some of the best guitarists are well-versed in both techniques, and employ them according to the situation and context. Different guitar styles require different techniques, and it is always good to know them.
Here are 4 Guitar Styles Everyone Should Know
Rock Style
It’s not easy to play rock guitar. Sure, anyone can learn the famous Smoke on the Water riff but even some of the most famous songs require complex approaches, notes and patterns. There are quite simply many rock songs you can’t learn how to play without the right guidance, which should tell you something about the complexity of the rock genre.
Classical Style
This one may be the hardest among them all. However, it is just as important as it is difficult as it will allow you to master and blend the other styles together very easily.
Blues Style
Both electric and acoustic guitarists like playing the blues. You may change the way you perceive music by just mastering the blues scale, which is unlike any other musical scale you have ever attempted to play. Your playing will have a lot more intensity and, dare we say, edge if you finally master it.
Bluegrass Style
For novices, learning well-known bluegrass riffs and notes is beneficial. Although the riffs can seem extremely basic by today’s standards, bluegrass is not as simple as it seems. Some people contend that bluegrass can occasionally be as complicated as rock. To train your ear, start by listening to vintage bluegrass virtuosos. After some time, you’ll start to hear the small differences that set great guitarists apart from good ones.
Tuning guide
In order to play guitar, you need to tune it well. Simply stated, an out-of-tune guitar is not functional and will sound horrible. In other words, none of your practice and hard work will translate into a guitar that has not been tuned.
In order to tune your guitar well, you must memorize the notes of each open string. The first string is E, the second is B, the third is G, fourth is D, the fifth is A and the sixth is low E. This is the most common guitar tuning, also known as standard tuning.
This is how your guitar should sound like if you’re aiming for standard tuning:
Tips for Better Guitar Tuning
-
Tune your guitar at each practice session
-
Protect your guitar from harsh environments
-
Always tune- UP to pitch
-
Train your ear
-
Check that your guitar has proper intonation
There are also alternate tunings, which are used by more advanced and adventurous players that have already mastered standard tuning. You can employ a guitar tuner in order to help you get the best results.
The Roadie 3 Automatic Guitar Tuner, A Great Solution for Tuning
Although using a tuner is recommended, tuning your guitar is a great opportunity to start training your ear. Listen carefully to how the pitch of the string changes as you turn the tuning pegs. Pay close attention to the sound the string makes when it is in tune. This can be a great introduction to ear training so you can develop your relative pitch.
The Basics
After you have a guitar in place, the first things to learn are a few basic chords. These chords are Em (E minor), C (C major), Am (A minor), Dm (D minor), G (G major). Follow this easy chord guide in order to learn them.
Em (E minor) C (C major)
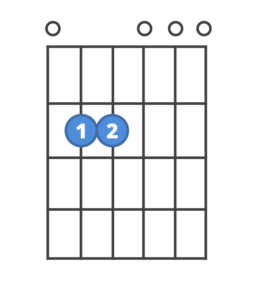
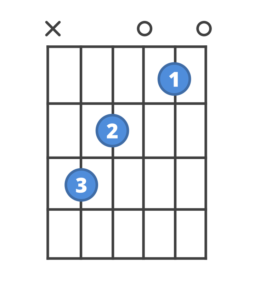
Am (A minor) Dm (D minor)
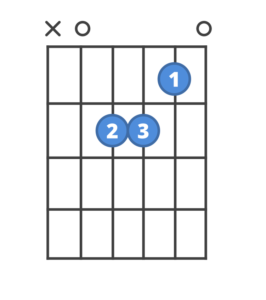
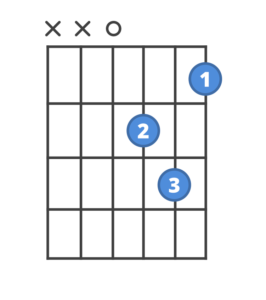
G (G major)
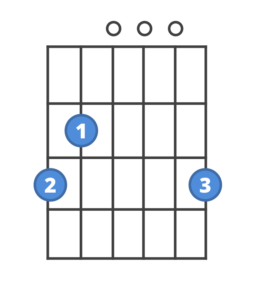
With dedication, you can have these chords down in just a few days, and then move on to learning some simple songs.
As a matter of fact, with just these few chords you can play dozens of songs, and start working on other aspects such as strumming patterns and changing chords fast.
Please know that chords are related to each other and some can grow into more complex pieces of harmony. Although there are hundreds of chords, in reality, you only need to know a few and how to transform them and combine them.
Practice Resources
We started this guide by stating that your progress depends on how much and how often you practice. This simple concept cannot be overstated. Practice is central to growing as a musician.
If you are just starting out, set aside 10 to 25 minutes of daily practice. Work on a few chords, strumming them downwards with each beat, and perhaps learn some easy songs.
This should be deliberate, uninterrupted, and fully focused. In other words, try to refrain from doing TikTok vids or IG stories while you practice (maybe after you’re done!) And avoid these common mistakes musisicans do while practicing:
Five Mistakes to Avoid When Practicing
Many young musicians tend to work in ways that are quite ineffective and can lead to frustration due to a lack of progress. Here we’re going to point you in the right direction so you can make time spent with your instrument as effective and fun as possible.
Practicing while doing something else
Practicing for 20 minutes on Tuesday and 5 on Thursday on a weekly basis will not help you much. You need to do it regularly, in other words, every day. There is no way around this one, as a daily practice regimen is the best way to get better at what you do. And please know that it is much better to practice 30 minutes every day for six days than three hours once a week.
Practicing material you already know
If you only play songs you already know over and over, you won’t be making much progress. You need to get out of your comfort zone and learn new pieces, techniques, and other material constantly.
Practicing without a metronome
Some experienced players state that you should use a metronome all the time while practicing. Others say that it should be used for certain exercises and drills. Just make sure you are incorporating the use of this powerful tool at some point in your practice session.
Not allocating time to practice
Even if you can only practice for 15 minutes a day, it is vital to set aside a specific time and place to do it. It could be after lunch, before work, during your nights, etc. The point is that you have your practice sessions scheduled.
As you progress, it is important to remain focused and productive in order to get better.
Songs to Get You Started
Learning songs gives context to everything you are learning. This is the essence of playing music, and it is important to understand it. After you spend time on chords, strumming, etc, you need to put it all together and in context. There is no better way to do this than by learning a song.
Naturally, in the beginning, it is advisable to start learning easy songs.
Once you know a few chords and strumming patterns, and have a good handle on the guitar, you can start learning popular songs.
-
Good Riddance – Greenday
-
One – U2
-
Patience – Guns N’ Roses
-
Wonderwall – Oasis
-
Down by the River – Milky Chance
Advanced Topics
So you’ve been practicing and already know several chords, strum patterns, etc? That is fantastic! You can move on to learning more advanced concepts. Mastering these will severely increase your ability in the instrument and make you a better musician. Below are a few of the more challenging guitar techniques and concepts you can work on.
Advanced Chords
The hardest guitar chords will be challenging at first. This is particularly true for your first bar chord. Once you master this, other bar chords will become simpler. Remember to be patient, practice, and have fun!
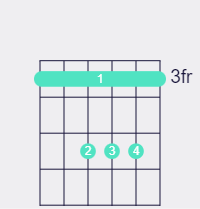
F Chord
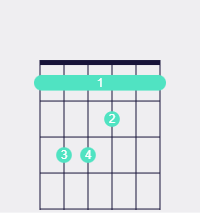
The F chord is typically the first major test in a beginner’s journey. Many give up after attempting to learn the F chord. This is because it is a bar chord.
To play it, place your index finger across the six strings of the first fret. In other words, place a bar on the first fret. Then, place your middle finger on the third string second fret, ring finger on the fifth string third fret, and pinky on the fourth string third fret.
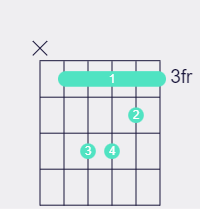
C chord (barred)
To play it, place your index finger across the strings on the third fret. Then place your middle finger on the fourth string fifth fret, ring finger on the third string fifth fret, and your pinky on the second string fifth fret.
It is important to note that, unlike the F chord, we are not going to play the six strings on the C major chord. Instead, we play it from the fifth string down, omitting the sixth string. As a matter of fact, your bar does not even have to touch the sixth string. It can be from the fifth string down.
F minor
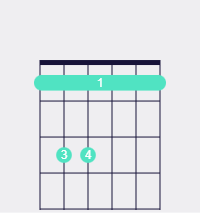
Remember the F major from above? If you simply remove the middle finger, then you create an F minor. Yes, just that easy! And now you can unlock all the minor chords with roots on the sixth string. Much like our original F chord, if you take an F minor chord and move it up two frets, you get a G minor chord. Keep moving it up or down for different chords, all minor with the root on the sixth string.
C minor
Here we employ the same principle as in the F minor, but with a chord that has its root on the fifth string. To create a C minor, we go to a C major shape and rearrange three fingers.
In other words, bar the third fret, then place your middle finger on the second string fourth fret, ring finger on the fourth string fifth fret, and pinky on the third string fifth fret.
Just like in the three chords before, this shape will give you all the simple minor chords that have a root on the fifth string.
Scales
What are scales? Simply said, a scale is a group of notes that happen in succession and have a certain structure. For instance, major scales have a particular structure that is different from the minor scale and others.
Scales are the backbone of music. Even if you have never consciously played one, chances are you’ve sung one when humming along to a song.
It is important to say that to use a scale, you don’t have to play all of the notes that belong to it. Also, you don’t have to play the notes in that particular order.
In other words, if you play the notes E, F, C, G, B, you are using the major scale.
How to learn scales
The best way to learn scales is by practicing them methodically. Just like anything, you start slow and with something basic like the C major scale. It is composed of the notes C, D, E, F, G, A, B.
First, you need to know the notes and the structure of the scale as described above. Then, it is important to learn it in just one position and one octave.
Once you’ve mastered that, you can then move to another position on the guitar neck, and so forth.
Scales are deeply related to chords
Did you know that chords and scales are related? So much so that each chord has a scale and vice versa. Let’s stay with the C major scale to illustrate.
As mentioned above, this scale is composed of the notes C, D, E, F, G, A, B. In that sequence, the first note is a C, the third is an E and the fifth is a G. Those three notes make up the C major chord. That simple!
In case you are wondering how that affects what you play, the answer is a resounding yes!
For example, let’s say you are playing an improvised guitar solo, you can use the C major scale whenever the song features a C major chord. You can also play the C major scale if the song is in the key of C.
Also, if you are writing a song and there is a C major chord, you can use notes of the C major scale to create the melody and it will sound good.
Don’t worry if that sounds too complicated now. It really isn’t, and you will realize this once you have just a little bit of experience.
Scales are also related to arpeggios
One of the most beautiful aspects of music is that everything is connected. Scales, arpeggios, chords, keys, tonalities… they are all closely related.
Remember the C major chord from above? Well, if you play the three notes of the C major chord, but one at a time instead of all together, you get an arpeggio.
Arpeggios
The theory behind arpeggios is simple. If you can figure out chords, you can figure out arpeggios. The real challenge arises when you want to learn them in all positions all over the guitar neck. Add to that learning different types of arpeggios, and you’ve got your work cut out for you. But it is well worth it.
As you may have inferred, arpeggios are very closely related to scales and chords. You can figure out how to come up with basic arpeggios by taking the scale in question.
For instance, let’s the A minor chord. The notes on it are A, C, and E. Why, you might ask. Because those are the first, third, and fifth notes on the A minor scale (A, B, C, D, E, F, G).
I understand that this may sound a bit complicated, but it gets easier. For now, just understand that arpeggios are made of chord tones played individually.
How to learn arpeggios
You can start off by learning major and minor arpeggios first. The process is very similar to learning chords. You begin with the easy ones, just simple triads that are either major or minor.
And just like with chords, you can then move on to arpeggios that have four notes and learn them all over the fretboard.
Take the time to learn them in different shapes and positions, much like you would with scales. Naturally, this process will take some time, but it will pay massive dividends.
The answer to what are guitar arpeggios is quite simple. The challenge lies in learning them and making them an integral part of your playing.
Simply said, arpeggios are a major part of becoming a guitar player. They form the building blocks of technique and will help you understand harmony more linearly.
Like most things guitar-related, it takes time to get good at arpeggios. Practicing constantly is the best way to learn and understand them. A word of caution though: if you just started playing guitar, you may want to work on chords and strumming patterns before arpeggios
A quick video to help you understand arpeggios better
Bending
World-class electric guitar players are typically masters in many techniques, and that includes bending. You can also bend on acoustic guitar, but this is much harder because the strings are much thicker.
However, when it comes to electric guitar, bending is widely used in blues, rock, country, pop, and even jazz. Icons like B.B. King and Eddie Van Halen had very different styles, but both used bending in their unique way to create magic.
Alternate Tuning
While musicians start off learning guitar in standard tuning, experimenting with alternate tunings is a progressive means of developing creatively as a musician. We’ve developed a complete Alternate Tunings guide where you can learn all about: Open tunings, Dropped tunings, and Step-down tunings…
Visit Roadie’s Alternate Tuning Library
These are just a few of the aspects and techniques that you can tackle once you have the basics down. Part of the beauty of learning guitar is that it is a never-ending journey where it’s impossible to stop growing if you keep working at it.
Maintaining Your Instrument
A well-maintained instrument is imperative for progressing as a musician. A good part of the maintenance of the instrument should be left to professionals. Setting up the guitar, changing pickups, changing frets, etc, should be handled by professionals to avoid damaging your instrument.
However, you can take care of other aspects like changing strings, changing the action, and superficial cleaning.
It is also important to know which strings your acoustic guitar needs, how to resolve nut ping, and more. Additionally, make sure you have some basic tools to help you along this journey of learning guitar.
How to Choose the Best Strings For Acoustic Guitars?
Choosing strings for your acoustic guitar depends on many factors. We’re here to help you navigate various choices and opinions. After all, what works for your guitar hero might not work for you. And chances are it won’t. Let’s dig in:
Steel-string vs nylon string
We’ll get this out of the way first by saying: nylon strings are for classical guitars and steel strings are for, well… steel-string acoustic guitars. Sounds basic right? You won’t believe the number of people that put steel strings on a classical guitar and vice versa. It just does not work, they are not interchangeable.
String gauges
The lighter the string gauge, the easier it will be to play and bend. However, light gauge strings are also easier to break and can cause unwanted fret noise. On the other hand, thick string gauges typically produce a louder and rounder tone. They are harder to break, but they are also much harder to play. Two sides to each situation… just like most things in life.
Guitar type, hand type
A bigger guitar will typically benefit from thicker gauges. A jumbo acoustic guitar has more acoustic space to produce a louder sound, and a thicker gauge would only maximize the guitar’s potential. However, if your hands are too small or just not too strong, you will need to use a lighter string gauge. Also, heavier gauges (thicker) create more tension and put more pressure on the guitar’s neck. This might be detrimental to an older instrument. In that case, using a lighter gauge is the way to go.
String type
For steel string guitars, there is bronze, phosphor bronze, brass, polymer-coated, etc. Each of them offers variations in sound, crispness, and feel.
How would you know what your hands are comfortable playing with? You have to try it out. Try different string brands, gauges, and types. Playing with different string sets is by far the best way to know what works for you.
Recording
If you play guitar, you will have to face a recording at some point. It may not be a major label recording, but chances are that at some point you will at least want to capture your playing.
This is not only a matter of pride but also of progress. Recording yourself and hearing what you truly sound like is one of the best ways to pinpoint your weaknesses and strengths.
Why Should You Record Your Practice Sessions?
-
You will know what your flaws are
Recording yourself will reveal your flaws as no other practice can. This is partly because you will be solely focused on listening. When you play, there is so much going on that you cannot process what you are hearing the same way as when you are not playing. This is precisely why recording yourself and listening back will reveal your flaws.
-
You will be able to track your progress accurately
Some musicians often feel disappointed by a perceived lack of progress. Others don’t think much about the progress and keep playing aimlessly, leading to unnoticed stagnation on the instrument. If you record yourself, you will hear precisely what has changed, and what has not.
-
You will develop a “showtime” mentality
When you record yourself, there is a tendency to try to do it as well as possible. This feeling is relatively similar to playing a show or going on an important recording session. Contrast this with just practicing with no way to measure anything and the ability to stop at any time without any consequences.
When you record yourself, you will want it to be a faithful representation of your abilities at that moment. That will keep you on your toes and force you to have a “showtime” mentality whenever you begin to record.
-
You will develop better criteria
The act of recording yourself and then listening to judge your playing will help you develop stronger criteria. With time, you will not only notice your tendencies or bad habits, but you will also want to keep up the good stuff.
For instance, you will be more critical of the sound you are producing and aim to make it consistent. That is true whether you practice guitar, singing, or bass, etc. It will help you develop a vision and something to aim for. This is especially true if you also listen to other peers on your instrument and try to take what you like about their sound and touch it and apply it to yours.
– Further Reading – Recording Yourself as Part of Your Practice
Chances are, you’ll probably be recording at home and not some fancy studio if you’re a beginner so here are some tips for creating your very own home studio!
Recording Tips for Home Studios
It’s possible to do so much with modern recording equipment. There are, however, a few things you should be aware of before digging in. Here are some recording tips for home studios:
Prepare
Great mixes come from great recordings. Make sure everything is set up and prepared before you start a recording session: Rehearse beforehand,warm-up, set up mics and amps, get in tune and check all strings and drum heads.
Create a DAW Template
Create one or more templates so you can quickly get started with a recording session. It will also save you time if you get a stroke of genius and you’ve just got to get something down right now.
Record at 24-bit
Your DAW will allow you to record in 16-bit and 24-bit. The higher the bit-rate, the more detailed and nuanced your recordings will be. 24-bit recordings take up more space than 16-bit, but they’re worth it.
Avoid Headphone Bleed
A lot of vocalists like to have the music track as loud in their ears as possible. That can be a problem with most cheaper headphones. It’s a good idea to invest in some sound-isolating headphones. Alternatively, get used to recording vocals with the music low. That will avoid it bleeding into the vocal recording.
Eliminate Environmental Noise
Many DIY musicians will record in the same room as the computer they mix on. Depending on your setup, you might have fans to cool down the computer. Fans make noise, and noise ruins your recordings. Minimize noise by reducing your fan speed, or by pointing your microphone away from your computer. An even better solution is to record in another room.
Record in a Separate Room
ll you need to do is lead two cables from your audio interface: one for the microphone and one for the headphones. There are many ways to go about it. My favorite toy is the Logic Remote, which allows me to control my DAW from the recording room.
Equipment vs. Performance vs. Acoustics
If something doesn’t sound right, you’ve got to identify the reason. Investing in a new microphone is pointless if it’s your performance that is lacking. Try to use the process of elimination when determining the cause of the bad sound.
Record Multiple Takes
You can usually cycle record on your DAW. Record multiple takes of the same segment and audition each take. It will allow you to create a composite track made out of all the best takes. Frankenstein it up!
Recording equipment has become very affordable in the last few decades, and you can try professional recording software for free.
– Further Reading – Recording Tips for Home Studios
However, just like playing guitar, recording takes practice in order to master it but can be very rewarding.
Final Words
We hope that you use this complete guide to learning guitar to start an exciting endeavor. Learning guitar may be challenging, but it is also fun and good for the soul. On top of that, learning music helps your brain make new connections that keep you sharp and young.
Remember that is important to practice constantly in order to see some progress. More importantly, music is about connecting with yourself and others. So please remember to enjoy the journey and have fun!